|
|
|
|
|
|
|
|
 |
 |
 |
 |
 |
 |
 |
 |
 |
 |
 |
 |
 |
 |
|
Ship Index |
Naval Signature Index |
Naval Artists Index |
Naval Art by Country |
Naval Art Offers |
|
| Navigation | |
| Page 3 of 7 | Previous .. Page 3 .. Next |
| Special Offer Naval Art |
|
|
|
|
|
|
|
|
|
|
|
|
|
|
|
|
|
|
|
|
|
| Navigation | |
| Page 3 of 7 | Previous .. Page 3 .. Next |
| Text for the above items : |
Return to Taranto by Ivan Berryman. The Italian destroyer Alfredo Oriani slips quietly through the open span of the swing bridge at Taranto after a long Mediterranean mission. This ship was present at the Battle of Matapan in March 1941 and was successful against Allied shipping during Operation Harpoon the following year. After the armistice, she was laid up at Malta and was eventually presented to the French navy at the end of the war as reparation, whereupon the Oriani was renamed D'Estaing and served under the French flag until 1954. |
The Brave Redoutable by Ivan Berryman. Already ravaged by incoming shot from the combined French and Spanish fleets as she approached the enemy line, HMS Victory found herself under intense attack from the French 3rd Rate 74-gun Redoutable. The two ships became entangled, grappling irons went across and the most terrible artillery battle commenced. Admiral Lord Nelson was fatally wounded by a shot from the Redoutables mizzen top before it was brought crashing down. Now the British three-decker, the 98-gun Temeraire appeared outboard of the Redoutable and began pouring further shot into her, the little French ship dwarfed by two mighty British vessels. But still she fought on, refusing to strike her colours. Of all the ships at Trafalgar, Redoutable sustained the highest casualties with 478 killed and 81 wounded. Depicted from left to right are HMS Temeraire, Redoutable and HMS Victory. |
U-453 by Ivan Berryman. The Type VIIC U-Boat U-453 began service in June 1941 under the command of Knight's Cross winner Egon-Reiner von Schlippenbach and claimed 10 vessels sunk including the Royal Navy minesweeper HMS Hebe. U-453 was sunk on 21st May 1944 by the destroyers HMS Tenacious, HMS Termagant and HMS Liddesdale off the coast of Italy. She is shown here on one of 17 patrols defending herself from air attack by a Catalina from RAF Coastal Command. |
Battle of the Nile by Anthony Saunders On the 1st of August 1798, thirteen French ships of the line sat anchored in Aboukir Bay off the coast of Alexandria, Egypt, in support of Napoleon who was inland with his troops attempting to conquer the country. As nighttime approached so did Lord Horatio Nelson and the British fleet. Nelson had been hunting Napoleon at sea for months; at Aboukir Bay he had found the French fleet, trapped and unprepared for battle. Nelsons audacious plan was to attack the French on their unprotected prot side, the plan had its risks; the whole of the British fleet could run aground in the shallows - but Nelson knew the waters too well. The Battle of the Nile was one of the most decisive in the history of naval warfare. By the end of the battle nearly all the French ships were sunk or captured. The 124-gun flagship - and the pride of the French navy - LOrient, had exploded with such ferocity that it halted the battle for over ten minutes. Napoleons ability to dominate the region had been crushed, whilst Nelson was to become a hero throughout the whole of Britain. |
HMS Sirius at Anchor by Ivan Berryman As dusk falls, a 28ft Pinnace makes its way through mirror-calm waters toward the 36 gun frigate HMS Sirius as she lies at anchor in Plymouth, early in March, 1804. She was lost in 1810 when her crew scuttled her after she grounded during the Battle of Grand Port. |
Nemesis by Ivan Berryman. Arguably the most iconic moment in British naval history, HMS Victory is depicted just moments from firing her devastating opening salvo into the stern galleries of the French flagship Bucentaure at Trafalgar as Nelson's flagship enters the fray at approximately 12.30pm on October 21st 1805. Beyond Victory, in the extreme distance through the gun smoke, Collingwood's Royal Sovereignis engaging the Santa Ana. To the left of the painting, the French Neptune and Spanish San Justo can be seen with Redoutable immediately beyond Victory, trying vainly to close the gap. Victory, already shot to pieces, is about to wreak her terrible revenge on the Bucentaure in the foreground where Vice-Admiral Villeneuve can be seen on the poop deck - wearing the green corduroy pantaloons. Nelson was surely the nemesis of Villeneuve, who had been summarily humiliated some seven years earlier at the Battle of the Nile and Nelson's tactics would again win the day for His Majesty's navy, albeit at the tragic cost of Nelson himself. |
HMS Victory Departing Portsmouth by Ivan Berryman. Nelson's flagship at the Battle of Trafalgar is depicted here passing the iconic Round Tower at the entrance to Portsmouth Harbour before dropping anchor at Spithead in readiness for her next voyage. With her is the sloop HMS Pickle, also a veteran of Trafalgar, who carried Admiral Collingwood's victory despatch to the Admiralty after the great battle had been won. |
PS Waverley by Ivan Berryman. Launched on the Clyde in 1947, the PS Waverley has been lovingly restored to her 1940s configuration and now operates regular excursions in Scotland and the waters of the south of England. |
British Pacific Fleet by Randall Wilson. HMS Howe leads Victorious and Implacable through the Malacca Straits. |
Midway: The Turning Point by Stan Stokes. The Battle of Midway in June of 1942 marked the turning point in the War in the Pacific, and the Douglas SBD Dauntless was the aircraft which provided the punch in this decisive victory for America. The SBD, which earned the nickname Slow, But Deadly, entered service with the USN and USMC in 1940. Powered by a 1,000 HP, 9-cylinder, Cyclone radial engine the SBD was capable of a maximum speed of 250 MPH. The Dauntless could stay airborne for a long time with its 1,300 mile range and slow cruising speed, and it was capable of delivering a 1,200 pound bomb load. Because of its slow speed the SBD needed armament to discourage attack by enemy fighters. Two forward firing machine guns and either one or two rear firing guns mounted in the gunners cockpit behind the pilot, gave the SBD enough firepower to make it a challenging target for enemy fighters. The Japanese plan for invading Midway, a strategically-located small island about 1,100 miles northwest of Hawaii, involved the use of a decoy fleet which would feign an invasion of the Aleutians, while the main fleet consisting of approximately 100 ships and four aircraft carriers would carryout the invasion. Based on intelligence reports the US Navy was ready for Adm. Yamamoto this time. The American force totaled 25 ships including the carriers Hornet, Enterprise, and Yorktown. Air power was about even, because the U.S. could count on nearly 100 land-based aircraft on Midway itself. About 1/3rd of the U.S. air power was represented by SBDs. During the first exchanges, American attacks on the Japanese invasion fleet with both land-based and carrier-based aircraft were repulsed with substantial losses. These low-level torpedo attacks focused the attention of both Japanese fighter pilots and AA gunners on the horizon. Lacking effective radar, the Japanese fleet would prove to be unprepared for a high altitude attack by swarms of SBDs on June 4, 1942. The timing proved perfect as the Japanese carriers were laden with fully fueled and armed aircraft being readied for a second wave. As depicted in Stan Stokes dramatic painting the 1,000 pounder of Paul Lefty Holmbergs SBD penetrates the carrier deck of the Soryu while Holmberg pulls out of his dive. Right behind Holmberg is another SBD of VB-3 from the USS Yorktown. SBDs from the Yorktown and its sister ship the Enterprise destroyed three Japanese carriers in a matter of minutes during this battle. While the Yorktown was later lost in the Battle, all four Japanese carriers were eventually destroyed including many of Japans most experienced naval aviators. The rugged and effective Dauntless, the only USN aircraft to remain in service through the entire war, was responsible for destroying more enemy shipping than any other aircraft during WW II. |
HMS Torbay - Opration Flipper by Ivan Berryman. In foul weather off the coast of North Africa on the night of 14th November 1941, HMS Torbay deploys men of 11 (Scottish) Commando for an audacious attempt to assassinate German General Erwin Rommel. Named Operation Flipper, the attempt saw 26 men from HMS Torbay join just 8 more from HMS Talisman - the rest trapped aboard by the weather - land 250 miles behind enemy lines in Libya, and march to the headquarters for the attack late on 18th November. While the Commandos made it to the target building, their leader, Lt Col Geoffrey Keyes was killed and they discovered Rommel was not there. Retreating to the landing beach to be picked up by HMS Talisman, they were intercepted by Italian forces and captured facing impossible odds, although a few managed to scatter into the desert and escape. Keyes was posthumously awarded the Victoria Cross, HMS Torbay survived the war and was scrapped soon afterwards. |
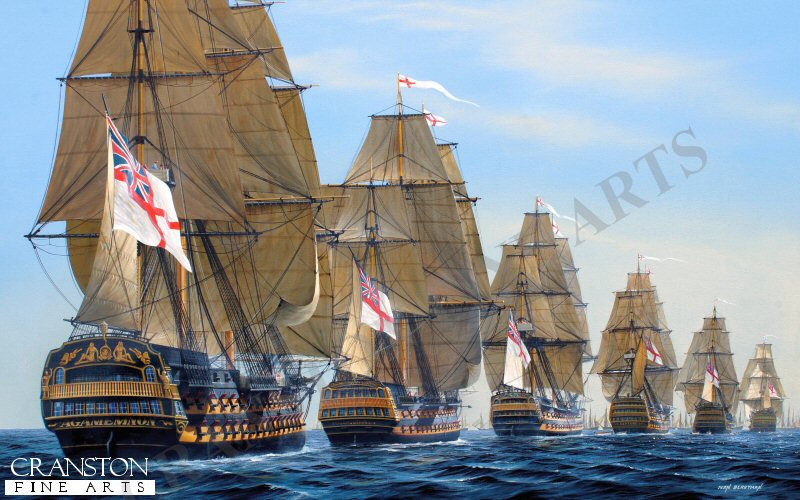
In Destinys Hands, Trafalgar, 12:15 PM by Ivan Berryman It is approximately 12,15 pm on 21st October 1805. With the combined Franco-Spanish enemy line in the far distance, HMS Victory is just beginning to manouevre, having chosen the French flagship Bucentaure as her target. Behind Victory lies Temeraire, then Neptune, followed by the two-deckers, Leviathan and Conqueror and Agamemnon in the foreground. Victory is flying the signal Engage the Enemy Closely from her main mast. Most ships have their studding sails set on the larboard (port) side only trying to harness as much wind as possible to hasten their approach 1n such light airs. At this stage, the stoves will have been extinguished, the guns run out and all decks cleared for action, their floors strewn with sawdust to avoid slipping and to soak up the blood. The Marines will be in position the officers at their posts and gun crews may likely have been singing hearty songs to raise their spirits. Fate alone knew what awaited them, once the firing started. |
HMS Invincible - The Dawn of Jutland by Anthony Saunders. The Battle of Jutland took place on 31st May 1916. It was the largest clash of battleships in history, over 250 ships from the Grand Fleet and the German High Sea Fleet took part. But both fleets struggled to gain supremacy in difficult conditions. The battle started well for HMS Invincible, together with Inflexible and Indomitable she formed part of the 3rd Battlecruiser Squadron under Admiral Hood. She scored eight direct hits on Lutzow which caused the German ship to withdraw from the battle and eventually sink. HMS Invincibles luck finally ran out when she was hit on the midships Q turret, the eventual explosion causing the ship to sink in two halves. Here Invincible is seen prior to the battle from HMS Nestor, one of the destroyer escorts of the 13th Flotilla. |
The Bombardment of Tripoli, 1804 by Ivan Berryman. Ships of Commodore Preble's Mediterranean Squadron are shown during the action of 3rd August 1804 when they provided support to the gunboats and mortar boats as they pounded the defensive walls and xebecs that were defending Tripoli. In the left foreground, the bomb boat Robinson rolls as she fires her mortar whilst the brig Argus takes up station behind Constitution, both of which are firing broadsides. The brig Syren is in the far distance, engaging more of the Tripolitan xebec gunboats, having cut inside of Constitution to engage the enemy more closely. |
Nerves of Steel by Ivan Berryman. Just moments from her devastating opening broadside, HMS Victory prepares to pass the stern of the French flagship, Bucentaure, to break through the line of the combined French and Spanish fleets as the Battle of Trafalgar begins on 21st October 1805. Victorys guns had remained silent until this moment, Lord Nelsons flagship having already suffered severe damage during the approach, but now the gun crews awaited the moment when her double-shotted cannon, her mighty 68-pounder carronade and a shower of musket balls would smash through the French vessel, rendering it at once a useless hulk. |
USS Tennessee During the Landings at Iwo Jima by Anthony Saunders. In February 1945, 850 square miles of volcanic rock became the most strategically important island in the South Pacific. From Iwo Jima heavy bombers would be able to raid Japanese cities almost at will. Even with its overwhelming military might, the Americans would have to pay a heavy price for such a seemingly small island. |
QE II by Ivan Berryman. Cunard Liner QE II (Queen Elizabeth II) in the late 1980s. The longest serving passenger liner in history, this iconic ship completed her final voyage in November 2008, becoming a permanently moored hotel in Dubai. |
Destination Tokyo by Stan Stokes. On April 18, 1942, Lt. Col. James H. Doolittle led a group of 16 B-25 bombers on a carrier-launched raid on industrial and military targets in Japan. The raid was one of the most daring missions of WW II. Planning for this secret mission began several months earlier, and Jimmy Doolittle, one of the most outstanding pilots and leaders in the United States Army Air Corps was chosen to plan, organize and lead the raid. The plan was to get within 300 or 400 miles of Japan, attack military and industrial targets in Tokyo, Osaka, and Kobe shortly after nightfall, and then fly on to a dawn landing at secret airfields on the coast of China. The twin engine B-25 Mitchell bomber was selected by Doolittle for the mission and practice indicated that it should be possible to launch these aircraft from a carrier deck with less than 500 feet of runway. On April 2, 1942 the USS Hornet and a number of escorts set sail from Alameda, California with the 16 B-25s strapped to its deck. This task force rendezvoused with another including the USS Enterprise, and proceeded for the Japanese mainland. An element of surprise was important for this mission to succeed. When the task force was spotted by a Japanese picket boat, Admiral Halsey made the decision to launch the attack earlier than was planned. This meant that the raiders would have to fly more than 600 miles to Japan, and would arrive over their targets in daylight. It also meant that it would be unlikely that each aircraft would have sufficient fuel to reach useable airfields in China. Doolittle had 50 gallons of additional fuel stowed on each aircraft as well as a dinghy and survival supplies for the likely ditchings at sea which would now take place. At approximately 8:00 AM the Hornets loudspeaker blared, Now hear this: Army pilots, man your planes! Doolittle and his co-pilot R.E. Cole piloted the first B-25 off the Hornets deck at about 8:20 AM. With full flaps, and full throttle the Mitchell roared towards the Hornets bow, just barely missing the ships island superstructure. The B-25 lifted off, Doolittle leveled out, and made a single low altitude pass down the painted center line on the Hornets deck to align his compass. The remaining aircraft lifted off at approximately five minute intervals. The mission was planned to include five three-plane sections directed at various targets. However, Doolittle had made it clear that each aircraft was on its own. He insisted, however, that civilian targets be avoided, and under no circumstances was the Imperial Palace in Tokyo to be bombed. About 30 minutes after taking off Doolittles B-25 was joined by another piloted by Lt. Travis Hoover. These two aircraft approached Tokyo from the north. They encountered a number of Japanese fighter or trainer aircraft, but they remained generally undetected at their low altitude. At 1:30 PM the Japanese homeland came under attack for the first time in the War. From low altitudes the raiders put their cargoes of four 500 pounders into a number of key targets. Despite antiaircraft fire, all the attacking aircraft were unscathed. The mission had been a surprise, but the most hazardous portion of the mission lay ahead. The Chinese were not prepared for the raiders arrival. Many of the aircraft were ditched along the coast, and the crews of other aircraft, including Doolittles were forced to bail out in darkness. There were a number of casualties, and several of the raiders were caught by Japanese troops in China, and some were eventually executed. This painting is dedicated to the memories of those airmen who made the ultimate sacrifice for their country and the thousands of innocent Chinese citizens which were brutally slaughtered as a reprisal for their assistance in rescuing the downed crews. |
Battle of Jutland by Charles Dixon. A line of Royal Navy battleships engage the German High Seas Fleet during the Battle of Jutland. |
HMS Prince of Wales by Brian Wood. HMS Prince of Wales is shown firing on the Bismarck and in the background a huge black cloud is all that is left of HMS Hood. |
Tribute to the Crew of HMS Truant by Ivan Berryman. Commissioned in October 1939, HMS Truant served in the North Sea for almost a year, notably damaging the German cruiser Karlsruhe in one action. Sent to the Mediterranean, Truant sunk several Axis merchant ships here, including the Italian tanker Bonzo depicted in this painting. Tracked off the east coast of Italy in the dark of 15th - 16th December 1940, Bonzo fell prey to one of three torpedoes, and was finished off from close range, sinking rapidly. HMS Truant continued successful patrols in the Med until May 1941, completing an Atlantic crossing for refit in the United States before returning in October that year. Sent to the Far East in 1942, the submarine returned to the UK around the Cape of Good Hope for another refit. Returning to service in UK waters in mid-1943, Truant was again sent to the Far East, making it as far as Malta before turning back with mechanical issues, spending the rest of the war as a trials ship in the United Kingdom. |
| Navigation | |
| Page 3 of 7 | Previous .. Page 3 .. Next |
|
Contact Details |
|
Sign Up To Our Newsletter!
This website is owned by Cranston Fine Arts. Torwood House, Torwoodhill Road, Rhu, Helensburgh, Scotland, G848LE Contact: Tel: (+44) (0) 1436 820269. Email: cranstonorders -at- outlook.com |
 |